Tuesday, October 12, 2010

CEMENT-STAINED FLOORS


PHOTOS FOR CEMENT FLOORS
STAINING PROCESS


1. FIRST we removed all the old tile or flooring as shown in top photo.


2. Then we scraped and scrubbed off all glue residue off surface.
We also rented a CEMENT GRINDER, (sorry I did not take a photo of it) and went all over
the floor with it to make it as smooth as possible.


3. Once it is as clean as you could possible get it, make sure you tape up all the walls with plastic so you don't stain them.

4. You will have to lightly mist the concrete floors with WATER BEFORE misting with stain.

**THE PHOTO AT THE TOP SHOWS THE AFTER WE SPRAYED WITH STAIN.

5. WAIT AT LEAST 24 HOURS TO ENSURE THAT STAIN HAS DRIED AND PENETRATED INTO CEMENT.

6. ONCE it is dried you will want to start cleaning up all the leftover stain residue. You can VACUUM IT WITH THE DRY/WET VAC. THEN you will have to "wash" it with water alone and keep on soaking it up with the vac.


7. You may use a mop also, making sure you rinse it off every so often so that you don't put the stain all over the floor again.

8.This is what it will look like after is is nicely cleaned and dried.
(not as beautiful as when you're finished putting the epoxy clear coat)


9. Start at one end and remember that you will have to walk yourself out of there! :) (when you buy the epoxy clear coat, it will tell you to mix 2 parts and wait 30 min. before applying--make sure you do so! Don't forget to add the skid resistant packet.)
Start rolling on and make sure you don't leave definite lines of demarcation.


10. This is a view of 3 different parts of the floor...The darker one is where the clear coat is drying, the white part is when we just applied the coat and the lighter yellow looking one is the floor before its been coated.


11. Don't forget to do the edges with a brush first.


12. We are just about done! Wait about 24 hrs to walk on and at least 48hrs to move items onto the floor. We went ahead and just waited the 48 hrs for any movement on them.

13. ONCE YOU DO IT, it will definitely seem more than 13 steps or pointers--IT IS!
AND IT IS ALOT HARDER THAN WHAT IT LOOKS LIKE!! VERY TIRING BUT SO WORTH IT! ESPECIALLY WHEN YOU CAN SAY YOU DID IT YOURSELF AND DIDN'T PAY THOUSANDS OF DOLLARS FOR SOMEONE ELSE TO DO IT!

THIS LAST PHOTO IS THE ONE OF MY SALON WHEN WE HAD OUR CHURCH CEREMONY.
EVERYBODY LOVES THE LOOK AND FEEL OF THE FLOOR!

Monday, September 20, 2010

more zebra

ZEBRA STRIPES...
YOU JUST CAN'T SEEM TO GET ENOUGH OF THEM...OR CAN YOU?

I MADE THIS SET FOR MY LITTLE ONE AND JUST PAIRED IT WITH A WHITE TEE


IT'S MADE FROM A PAIR OF JEANS THAT NO LONGER FIT AND SOME LEFTOVER MATERIAL FROM HER ZEBRA DRESS.

THE SANDALS ARE FROM THE DOLLAR STORE AND I ADDED SOME BOWS AS WELL AS THE HEADBAND. IT IS NOT TOO HARD, THE SEQUINS IS WHAT TOOK ME THE LONGEST. I TRIED TO SKIP A COUPLE IN BETWEEN THE SEWING BUT IT DID NOT LOOK GOOD.
HAPPY SEWING!

Monday, September 13, 2010

GIVEAWAY Winner from Along for the Ride!

Leslie is the lucky winner for the Giveaway. Hope to get her email soon that I can send her the items and she can say what she'll be making!!

Wednesday, September 1, 2010

GIVEAWAY @ Along for the Ride!


GIVEAWAY @ ALONG FOR THE RIDE...
Laura has invited me for a giveaway feature she is currently doing. I've decided to give away some AWESOME FABRIC FLOWERS, already made and just ready to be turned into whatever you want them to be; along with 6 squares of fabric that would be perfect for a FALL tote!!
If you're interested in entering, leave a comment here and/or follow and make sure you let Laura know over @ Along for the Ride. Ends on Sept. 6th! Go on over for the details.
If you can pass the word around! Thnks!

Wednesday, August 25, 2010

Scrappy Purses Anyone?


Lately I've been trying to make use of all the scrap/remnants I have left over and started making totes/purses with them.


This one is one that I'm still playing with as I have not finished the handles, but eventhough the design is cute I don't think it's very practical as the mouths' a little tight (but hey it has a nice round bottom to just throw your stuff in).


This one is one of my favorites, made with ruffles, flowers and yo-yos.


This tiny one is so cute with the bright colors! What I didn't know until I posted this is that they're All PERFECT FOR FALL!


I would love to soon post a tutorial for some of these but I'll see if I get any responses, I'm still trying to figure them out as best as possible.

Sewing Room (more like "section")


Who SEWS LIKE THIS??


We have a 3/2/2 house and this is suppose to be our dining room.
We have a big breakfast room with magnificent lighting that we just always seem to eat all our meals there, or maybe its' just that this space has "white" (yea--its suppose to be white but w/ 3 monkeys "idk" how it got this ugly color) carpet.
So, anyways I've just been storing my shop furniture in this corner and using my kitchen as my sewing room. Well my husband got tired of having everything laying on the kitchen table that he just organized this space for me this weekend, well it's only been a couple of days since I got my "fortress" and I can't believe I already made such a HUGE MESS!! Really Honestly, how did I do this???

Couldn't I just grab something and then put it nicely back up from where I got it?? Nope, because I always seem to be working on about 3 or more different crafts at the same time!!
I do promise to sometime SOON post pictures of HOW I ORGANIZED THIS ROOM.

Wednesday, August 4, 2010

The Best
Shrimp Alfredo Fettuccine
with spinach and mushrooms


If you're a pasta lover then you're sure to love this recipe!! When I first got my hands on it
I would cook it just about every week! It is really simple and simply delicious! Just as good (or better) as the restaurants and definitely economical.
Ingredients:
Shrimp (wal*mart sells their 40/60 bag for $5-that's enough for my family of 5 and leaves some leftovers)
1 pckg of Fettuccine
1 medium carton of Hvy Whipping Cream
1 bag of Parmesan Cheese
1 pckg of Mushrooms
1 bag of Spinach
1 tomato (optional)
Garlic powder
or Minced Garlic
pinch of Parsley
Black Pepper
Creole Seasoning
to taste (optional)
Butter
EVO


FIRST, cook FETUCCINE according to package directions, put aside and drizzle with EVO (extra virgin olive oil).
Prep your mushrooms, shrimp, spinach by cutting what you need to. (Tomato is optional and its to garnish it at the end, dice.)

SAUCE:


Melt the butter and add garlic


Add the Heavy whipping cream.


(OOops out of order--sorry--this is when you saute' the mushrooms)
You saute' them with butter and garlic, according to taste.


Add the Parmesan cheese to the sauce making sure it's not boiling, just hot. Make sure you stir it and let the parmesan melt without it sticking to the pan.


Here you add the parsley and black pepper according to your taste.
Once you're through go ahead and put aside or keep on low warm (making sure you stir everynow and then). The longer you cook it the thicker it will get so it's a matter of taste.


Once you saute the mushrooms as pictured before, add your spinach.


...Then your shrimp...cook well.


...and season to your liking...you can leave it as is with butter and garlic but I really enjoy the creole seasoning.


Stir.
I didn't take photos of the fettuccine but once your sauce and shrimp are done, you can either serve the fettuccine and layer it with shrimp and sauce or I prefer to place the fettuccine in the pan I cooked it in and pour the sauce. That way it saturates better and unsticks the fettuccine, stir and then serve.

SERVE, top with diced tomato and fresh parmesan.

I don't know how this went for my first Recipe but let me know if you have any questions or feel free to comment on how you make yours.
Hope you enjoy it as much as I do and don't fret too much over how fattening it must be...hahaha...it's well worth it!!

Saturday, July 31, 2010

Vintage Find: Chunky Cameo Necklace!


Vintage Cameo


I don't know about you but I'm in Awe of everything vintage right now! Yesterday I passed by this Antiques and Vintage store called "VintageRose" (cute name) anyways, I've always passed by it and always thought, "I should really stop by someday". Yesterday was the day I finally did, oh boy did they have some really nice stuff in there! I fell in love with the jewelry, pins and brooches!! They just don't make them like this anymore! Just wanted to show you some pics, it's like nothing out there...I'm not the person to make impulsive purchases (ok I may be lying there a bit...LOL) but my husband was the one insisting I buy it--he knows how I work!

Saturday, July 17, 2010

Mod Podge


Mod Podge?
Have you heard of it?
Me neither, or at least I hadn't till I started blogging, but its such a neat thing---
You HAVE to try it!
And that's Definitely what I did... I wanted to post a tutorial on these shoes but I rather not because the photos show how ugly and nasty these shoes were and you might be like...eww..what the...?!
But it was my first time so I def didn't want to use a good pair if you know what I mean.
Anyways I'm sure you can just google it and you're sure to find more than a handful tutorials on this.
I made my daughters old pair and then added rhinestones as embellishments....they came out cute! Let me tell you to make sure you put a heavy coat of mod podge on the bottom by the sole; let it dry in between coats because I didn't do that and they started coming off after the second use!


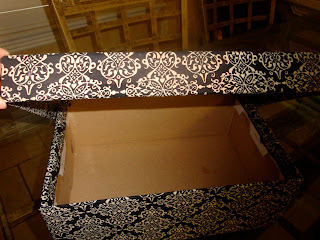
In the Mod Podge mood I was, I decided I needed a photo box, you know to put all the photos that you haven't had time to organize into an album or scrapbook.
I used a regular shoe box, laid it on top of my fabric and cut as if to wrap a present.

Making sure everthing fits neatly, cutting corners and then applying modpodge.
I then also applied a coat of modpodge on the outside.

I used some scrapbook paper and cut out designs from my SCAL with the Cricut Expression machine.

Fabric Flowers


This is all the craze for me right now:
FABRIC FLOWERS!


Out of anything and everything, in any which way I can fold and sew them.
The embellishment part is a whole lot of fun trying to match each with its own "personality". I'm really into the pearl and vintage look right now.


These are perfect for just about anything: clips, brooches, t-shirts, endless possibilities!
It's funny how I can have a BLAST all by myself! :)

I plan on having a section in my hair salon as a "mini-boutique" for all the crafty-goodies I enjoy making. I don't think I'll ever stop, even if I don't have time I'm sure I'll find some. It's purejoy!

Doesn't it look nice?